Earlier this year I bought a Austrains G-class in of all things: VR blue and gold. Up until a week ago it was running fine. The last weekend I put it on the track and went to move it, a loud grinding sound could be heard emanating from the loco. Oh great, sounds like a motor is about to cark it. It went back in the box and waited until I had a night free to take it apart and find the problem. Well it wasn't hard to find:
Those filings are from one of the flywheels. Turns out they were grinding on something, that something appeared to be a wire or screw that I had no access to. I did find that the motor mount has a fair bit of play in it, in fact I could lift the motor inside the mount! So the fix was to put some packing under the motor. What did I use?
Turns out a used chocolate packet can come in handy for these things:
That is the packer being positioned under the motor. On top of the board is the TCS DP2X decoder I installed not long after purchasing the loco. Initial tests indicate this repair has been successful. Saves have to send the loco back anyway.
Friday, 17 October 2014
Saturday, 4 October 2014
Guard against trouble 2
Painting an item of rollingstock you've built can be a joy or a curse depending on the number of colours you might have to use. The Z van proved to be the later as I used no less than 5 different colours to get the result I wanted (that is 2 more than the instructions dictate):
The main body colour is 'wagon red' (using Humbrol #100), the underframe and handrails satin black (Humbrol #85), roof a sandy tan colour (Humbrol #63) window surrounds and blinds for cupola windows light grey (Humbrol #40) and finally the stove chimney metallic silver (Humbrol #11). There is a 6th paint colour I use to do the axles and wheel faces which is an old pot of Polyscale Grimy black to cover the shiny brass of the axles and the raw steel of the wheel faces.
Anyway enough of the waffle, here is the van ready to go:
Just a final thing on those window blanking plates, I gave the wrong styrene thickness in the diagram. I used Evergreen .25mm sheet and not .025" (which you can't get anyway). I'd like to build another one of these in the near future to the same spec but coded as a Z and not a ZL.
Anyway enough of the waffle, here is the van ready to go:
Just a final thing on those window blanking plates, I gave the wrong styrene thickness in the diagram. I used Evergreen .25mm sheet and not .025" (which you can't get anyway). I'd like to build another one of these in the near future to the same spec but coded as a Z and not a ZL.
Saturday, 27 September 2014
Guard against trouble
Been a while since I last built a Steam Era Models Z van. Each time I do one I improve on the construction of the last. The last one I built was the smooth door version when first released at Hobson's Bay back in 2009 (it has since been sold). I decided it was time to tackle another one since I need at least 3 in my fleet. The construction was pretty quick, in fact only taking a couple of days after purchase of the kit. I made one big change and that was the blanking of the centre cupola windows to reflect the Z van in later life.To help those who wish to do this modification to their Z van I've included a diagram with measurements for the blanking plates, along with pictures of the model ready to go in for paint:
Saturday, 20 September 2014
Get that fact!
This was a title for an article that appeared in the June 1998 issue of the Australian Model Railway Magazine on how to obtain information to tackle a modelling project. Some 16 years have passed since that article was published and the sources for information have developed further, particularly here on the web.For something different I'm going to document some of the steps I go through to model wagons that are not so mainstream.
Modelling rollingstock that is preserved does make the task a bit easier. My choice to have a collection of rollingstock modelled on items at the Victorian Goldfields Railway helps a lot. Where it gets tricky is if the item is no longer on the railway or has been modified in some way. Fortunately the later is not really a big problem yet. It also helps if there is something suitable on the market that at least gives you the bulk of the wagon to work with and you then just modify the details.
Here is such a project I tackled last year, a HD wagon:
Now I was fortunate that Steam Era Models make a kit for this version of the HD which was originally built as a U van. There was a catch: the prototype I chose to do is somewhat different to the standard kit:
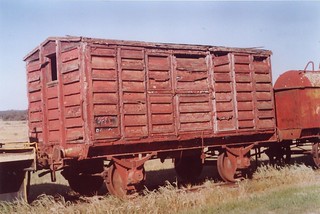
The axleboxes are different for a start. The handbrake is also on a different side to that suggested in the kit instructions. The more obvious difference though is that there are 3 windows. One at each end and one on the handbrake side. The photos on Norm's site were a big help, along with some from my own collection that were taken years ago on a 'may be needed one day' basis. Having built a couple of the newer SEM 4-wheel open wagons I had a supply of spare round axlebox lids so it was simply a case of filing the old ones down and sticking the round ones on. The V hanger for the handbrake lever was also modified so it was shortened and placed on the appropriate side for this wagon. The final modification was the fun part, adding the windows. As it is a louvre van it did help with the location of where to cut the holes. And here is that photo again of the model prior to painting that shows the windows and the styrene strip used to form the window frames:
Some websites and other sources that may help you when you contemplate that next rollingstock project:
-Mark Bau's Victorian Railways site: http://www.victorianrailways.net
-Peter Vincent's website: http://www.pjv101.net/index.htm
-Rob O' Regan's website: http://www.robx1.net/
-Norm Bray's Flickr site: https://www.flickr.com/photos/60901191@N08/
-Brief History Books: http://www.bhbooksvic.com/
-Your local library.
-Local model railway club.
-ARHS Victorian Division (extensive archive of photos and drawings).
And others I may have neglected to mention.
Modelling rollingstock that is preserved does make the task a bit easier. My choice to have a collection of rollingstock modelled on items at the Victorian Goldfields Railway helps a lot. Where it gets tricky is if the item is no longer on the railway or has been modified in some way. Fortunately the later is not really a big problem yet. It also helps if there is something suitable on the market that at least gives you the bulk of the wagon to work with and you then just modify the details.
Here is such a project I tackled last year, a HD wagon:
Now I was fortunate that Steam Era Models make a kit for this version of the HD which was originally built as a U van. There was a catch: the prototype I chose to do is somewhat different to the standard kit:
Photo sourced from Norm Bray's Flickr Flickr site
The axleboxes are different for a start. The handbrake is also on a different side to that suggested in the kit instructions. The more obvious difference though is that there are 3 windows. One at each end and one on the handbrake side. The photos on Norm's site were a big help, along with some from my own collection that were taken years ago on a 'may be needed one day' basis. Having built a couple of the newer SEM 4-wheel open wagons I had a supply of spare round axlebox lids so it was simply a case of filing the old ones down and sticking the round ones on. The V hanger for the handbrake lever was also modified so it was shortened and placed on the appropriate side for this wagon. The final modification was the fun part, adding the windows. As it is a louvre van it did help with the location of where to cut the holes. And here is that photo again of the model prior to painting that shows the windows and the styrene strip used to form the window frames:
Some websites and other sources that may help you when you contemplate that next rollingstock project:
-Mark Bau's Victorian Railways site: http://www.victorianrailways.net
-Peter Vincent's website: http://www.pjv101.net/index.htm
-Rob O' Regan's website: http://www.robx1.net/
-Norm Bray's Flickr site: https://www.flickr.com/photos/60901191@N08/
-Brief History Books: http://www.bhbooksvic.com/
-Your local library.
-Local model railway club.
-ARHS Victorian Division (extensive archive of photos and drawings).
And others I may have neglected to mention.
Sandman
Department stock on railways always throws up some interesting wagons that are modified for a specific duty. This particular wagon is a HD loco sand wagon based on the Tommy Bent I wagon. These particular I wagons were converted from Tommys to IC Tippler wagons by removing the side doors and welding a sheet of steel in place. They were converted to sand wagons by adding a hopper and discharge pipes.
The wagon has been made up using a Steam Era Models Tommy Bent I wagon and a VR Casts conversion kit which includes new sides and the hopper. Probably one of the easiest kit bashes to do with the extra bits:
While it does come with decals to suit the HD sand wagon, I decided to substitute the 'Dried Locomotive Sand Only' signage with some BGB ones from my decal box. It is likely my wagon will cover more mileage than the prototype which didn't travel often.
The wagon has been made up using a Steam Era Models Tommy Bent I wagon and a VR Casts conversion kit which includes new sides and the hopper. Probably one of the easiest kit bashes to do with the extra bits:
While it does come with decals to suit the HD sand wagon, I decided to substitute the 'Dried Locomotive Sand Only' signage with some BGB ones from my decal box. It is likely my wagon will cover more mileage than the prototype which didn't travel often.
Not another open wagon!
Yep seems that way. I don't think you can ever have enough of these. This is a Steam Era Models welded RY wagon with the early type lever handbrake I finished recently:
I'd like to do more of these with the later type handbrake in the future.
Friday, 29 August 2014
Trim and Terrific
Having aquired a Black Diamond Models Flat-Top T-class last year, I set about giving the model a spruce-up recently. The paint was looking a little worn and as I wanted it to be a near-enough representation of T345 as it ran at Maldon in the 1990s it need yellow handrails.
Before:
And after:
The loco is now back on the operational roster and is quite often paired up with my Bendigo Rail Models T333.
Before:
And after:
The loco is now back on the operational roster and is quite often paired up with my Bendigo Rail Models T333.
Subscribe to:
Posts (Atom)


