Tuesday, 27 February 2018

Container Traffic: A conclusion

I wasn't sure if I was going to bother putting this one up but I thought 'why not'. There are clearly plenty of people who like seeing models built rather than always bought off the shelf. This one is a leftover from my plans to have a container train originally started about 5 years ago (see this post from when I commenced the build). But plans change and I decided to give them the flick, so they are now with new owners. The wagon featured in this post was started just before I changed my mind and it ended up being put in a box part painted and forgotten about....till recently.

I decided that it wasn't going much good sitting in the box and it could be finished off and then sold to someone who will get some use out of it. So it got put through the paint shop and it has now been finished. One thing that changed in those 5 years was the type of paint used for the first coat, which was Floquil Caboose Red from memory. I paint most wagons destined to be painted VR Wagon Red with Humbrol #100 Red-Brown these days and it better represents the colour used on the real thing (the original 3 painted with Floquil paint can be seen here). I will be doing a post on paints I use for modelling later in the year perhaps.

Anyway enough of all that, you want to see the model now don't you:

I have to say, those Kadee #5 couplings look big now, as I now mainly use the #158 scale version with the wisker centering springs and snap together draft boxes. But they will do the job as intended. I left off the VR logos and coded it as a FQF.

If anyone is interested in purchasing this one from me you can leave a comment or get in touch with me via e-mail: matthewd21@hotmail.com .

Sunday, 25 February 2018

A prototype, and a ‘what-if’

While I like modelling things as prototypically as possible, if an opportunity comes up to model something a bit more along the lines of ‘what if’ then I’ll give it a go. That is certainly the case with the model featured in this post.

 Early last year I obtained various items on the basis that I would use them for projects. One of these, a E wagon made from a pair of Lima GY wagons, was featured in a post last year and there will be a follow-up on this once it has been finished off. Another item I obtained was an old Trax NSW MRC refrigerated van which had been part assembled but was missing a roof:
The MRC type vans were first introduced on the NSWGR in 1932 to provide a refrigerated car capable of operating at 70mph on the then newly upgraded Main South and Short North lines. Previously this traffic was carried by the BRC type vans which could not be operated at the new speeds and hence the need to build new vans. The body design was similar for both. In typical railway fashion they were modified during their service life for different jobs and were all out of service by the 1980s. A couple of examples have been preserved.

Rather than build it as a true NSW MRC I thought about making it into a van that may have operated on the Victorian Railways if they had obtained such a wagon but with a plain roof and no ice hatches. The roof was constructed using spares obtained from building SEM kits (which quite often come with a spare roof owing to the way the tooling has been done) and likewise with some of the undergear detail. I choose to add a ratchet style handbrake to one end which is typical of most VR vans and added shunter’s steps.

Now the story gets a little more interesting. While at the Corio exhibition in January 2018 I spotted a original release TrainOrama MRC on a second hand stall. It was in very good condition for a model with no box and at least 25 years old with the signage still like new. It was going cheap and so I decided to add it to my collection. It now means that when I finish my Trax MRC I can run the pair together. I mainly have wagons which are some variation of red, so a couple of white vans will be a nice change in the fleet.

The TrainOrama van is no longer available as a stock item (as far as I know). However SDS Models do make the MRC and all it's variations and you can check them out here: http://www.sdsmodels.com.au/mrcx.htm


Friday, 23 February 2018

Give me a sign-al


Now this is another one of those projects that has been left wanting to be finished for far too long. So the solution is simple: finish the bloody thing!

This is a Heritage Scale Models VR Home signal which has been given a lick of paint for return to its owner. I’d like to say I built these but alas I didn’t. The stories I have read and heard about the fidelity in putting one together is probably enough to put me off trying anytime soon anyway. The owner has been pretty patient and that might have something to do with the layout it ‘could’ be seen on in the near future. Detailing that layout here might be a bridge too far at this point (some might work that one out) but it might be covered in a future post.

Anyway here is the signal all dressed up apart from some coloured ‘glass’ in the spectacles.

 I also have another one of these for myself which also needs to be painted. But since I don't have a layout to plant it on yet I'm not in any rush to bother with it yet.

Tuesday, 20 February 2018

When the wrong kit becomes the right one

Some time ago I purchased a Broad Gauge Bodies V wagon kit with the intention of making a PH power van so I could run my A-class on my N-set prototypical (as most VR modellers know the A-class were not fitted with Head End Power so they required a PH van in the consist to provide this power). As it turned out, I had the wrong kit for this project:

Photo from Norm Bray's Flickr site: https://www.flickr.com/photos/60901191@N08/
The version I have is one with a central door of the earlier pattern. As you can see in the above photo, the PH vans have two doors and they are of the B van type. What a bugger!
So the kit got put away until I happened to flick through one of my volumes of the Brief History Books produced a couple of years ago and came across another van which I had intentions of modelling one day:

 One of my photos taken on a visit to Maldon
This is a VZVA van (originally coded HD for departmental traffic). Two of these vans were put into service to transport chemicals for the Weedex Train and given roads numbers 247-248. Of these wagons 247 has ended up as part of the Victorian Goldfields Railway collection (hence why I wanted to model it). So the kit I bought by 'mistake' turned out to be the correct one to model this very van!

It is still early days with getting this one together. The biggest challenge is the curved roof. BGB provide some corrugated card and some thin metal sheet. Basically you have to shape the metal to the correct profile and then stick the card over the top of it. This takes time and cannot be rushed as you end up with a dodgy roof otherwise.
I should point out that the first attempt did not go all that well after gluing it down and I had to do some trimming (superglue has a nasty habit of grabbing before you are ready....and not grabbing quick enough when you are) but I did salvage it. The next time you see this project it should have progressed to a stage where it can be painted.

Now I just need to get the correct kit to build that PH!

Tuesday, 26 September 2017

Comparing Bricks…hold the mortar


A couple of posts ago I compared two VR B-class models from different manufacturers and their differences. Will this post will be doing the same thing with another pair of models of a different locomotive.

The G-class Co-Co diesel locomotive was first introduced in 1984, a year after the Victorian Railways changed to V/line. The first order for G-class was for 5 locomotives, which ended up being fulfilled by using locomotives originally allocated to be built for Australian National as the BL-class. These 5 locomotives, G511-G515, paved the way for further builds. The balance of G-class, G516-G543, was built in two batches. They were used on heavy freight workings and the occasional passenger service, in particular the Sydney-Melbourne express on standard gauge after the demise of the Southern Aurora and Spirit of Progress in 1986. A number of the G-class are still around today working with private operators.

In model form the G-class has been produced by a few different companies over the years. Broad Gauge Models commissioned Samhongsa to produce the first such model in 1986. Dual Gauge Products also produced body kits for the second and third batch Gs. In this post I’m covering the two RTR plastic models produced thus far to date.

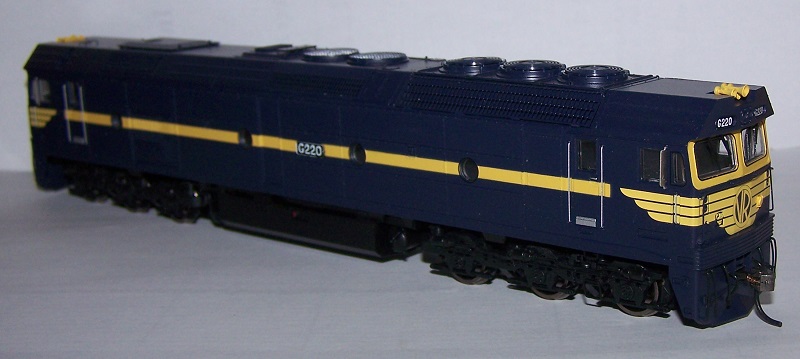
The model in the V/line orange and grey livery was produced by Powerline as early as 1989. It represents G521 which is from the second batch of Gs. The model in the ‘what if’ blue and gold livery was produced by Austrains in 2014 and represents a first series G and the long standing joke in the model fraternity that the first G was ‘accidentally’ painted in blue and gold after construction finished at the Clyde Rosewater plant in South Australia. Thus it also carries the now infamous number G220 that has been portrayed on repaints of Powerline G-class by a couple of modellers over the years.

The differences in these models (putting aside liveries and which batch they represent) is many, just like it was with the two B-class models. The Powerline model uses the ring-field motor like the Lima B-class and this motor was offered in the most recent re-release of this same model in the early 2000s. Powerline in both instances offered the model with a single powered bogie or both bogies powered (dual motor). One change in the 2000 re-release was to provide a circuit board for the electrics. However it did not incorporate a DCC plug. The model pictured pre-dates the re-release so it has simple wiring. The Austrains model features all the things you expect of a model produced in recent years including a 5-pole skew-wound motor with flywheels driving the wheels through driveshafts and gear towers as well as a modern circuitboard with a 8-pin DCC plug and the lights provided by LEDs.
Anyway I’ve waffled on again too much, here are some pictures of the pair together:   


I will be doing another comparison of another ‘then and now’ model in a future post.

Tuesday, 12 September 2017

Another long winded job completed

This is a project that has taken a while to get around to finishing. Happily I can now say that it is finished.

These two Steam Era Models Z vans have been in the works for at least a year. They are a bit different from the previous one I built for myself as they represent the ZD type which had buffers and dual couplings. This required the use of longer shank couplers on the models so they can still be coupled to other buffered stock without buffer-lock becoming a problem. Finding suitable decals to code them as ZDs was also a small problem but after raiding the decal box I found something suitable (even if slightly too big).

Because this blog was in hiatus when I started building them, here is a couple of photos prior to painting:


And here they are painted, decalled and with the couplers fitted:


For those with a sharp eye you will note that one van (470ZD) has the standard flip-top axleboxes while 19ZD features split-pan axleboxes (which is why the bottom running boards are a bit higher). They are now ready for the patient client who can run them with the 4 W cars I did for them earlier as a complete set.

The next likely job will be finishing the 3 M cattle wagons which will clear my backlog of jobs a little bit.


Friday, 18 August 2017

What a load of Phosphate...again

Well things happened a lot quicker than I expected and the model is now ready for the road:


One thing I will have to remember for the next kit I build from Railmotor Models is that the decals are a bit of a pain. The large VR logos started coming apart when I tried sliding them off the backing paper. The smaller decals I didn't have a problem with.

The next planned job is to finish some Z vans for a client.