Friday 17 October 2014

Oh G what now?

Earlier this year I bought a Austrains G-class in of all things: VR blue and gold. Up until a week ago it was running fine. The last weekend I put it on the track and went to move it, a loud grinding sound could be heard emanating from the loco. Oh great, sounds like a motor is about to cark it. It went back in the box and waited until I had a night free to take it apart and find the problem. Well it wasn't hard to find:


Those filings are from one of the flywheels. Turns out they were grinding on something, that something appeared to be a wire or screw that I had no access to. I did find that the motor mount has a fair bit of play in it, in fact I could lift the motor inside the mount! So the fix was to put some packing under the motor. What did I use?

Turns out a used chocolate packet can come in handy for these things:
That is the packer being positioned under the motor. On top of the board is the TCS DP2X decoder I installed not long after purchasing the loco. Initial tests indicate this repair has been successful. Saves have to send the loco back anyway.

Saturday 4 October 2014

Guard against trouble 2

Painting an item of rollingstock you've built can be a joy or a curse depending on the number of colours you might have to use. The Z van proved to be the later as I used no less than 5 different colours to get the result I wanted (that is 2 more than the instructions dictate):

The main body colour is 'wagon red' (using Humbrol #100), the underframe and handrails satin black (Humbrol #85), roof a sandy tan colour (Humbrol #63) window surrounds and blinds for cupola windows light grey (Humbrol #40) and finally the stove chimney metallic silver (Humbrol #11). There is a 6th paint colour I use to do the axles and wheel faces which is an old pot of Polyscale Grimy black to cover the shiny brass of the axles and the raw steel of the wheel faces.

Anyway enough of the waffle, here is the van ready to go:

Just a final thing on those window blanking plates, I gave the wrong styrene thickness in the diagram. I used Evergreen .25mm sheet and not .025" (which you can't get anyway). I'd like to build another one of these in the near future to the same spec but coded as a Z and not a ZL.

Saturday 27 September 2014

Guard against trouble

Been a while since I last built a Steam Era Models Z van. Each time I do one I improve on the construction of the last. The last one I built was the smooth door version when first released at Hobson's Bay back in 2009 (it has since been sold). I decided it was time to tackle another one since I need at least 3 in my fleet. The construction was pretty quick, in fact only taking a couple of days after purchase of the kit. I made one big change and that was the blanking of the centre cupola windows to reflect the Z van in later life.To help those who wish to do this modification to their Z van I've included a diagram with measurements for the blanking plates, along with pictures of the model ready to go in for paint:


Saturday 20 September 2014

Get that fact!

This was a title for an article that appeared in the June 1998 issue of the Australian Model Railway Magazine on how to obtain information to tackle a modelling project. Some 16 years have passed since that article was published and the sources for information have developed further, particularly here on the web.For something different I'm going to document some of the steps I go through to model wagons that are not so mainstream.

Modelling rollingstock that is preserved does make the task a bit easier. My choice to have a collection of rollingstock modelled on items at the Victorian Goldfields Railway helps a lot. Where it gets tricky is if the item is no longer on the railway or has been modified in some way. Fortunately the later is not really a big problem yet. It also helps if there is something suitable on the market that at least gives you the bulk of the wagon to work with and you then just modify the details.

Here is such a project I tackled last year, a HD wagon:

Now I was fortunate that Steam Era Models make a kit for this version of the HD which was originally built as a U van. There was a catch: the prototype I chose to do is somewhat different to the standard kit:

Photo sourced from Norm Bray's Flickr Flickr site

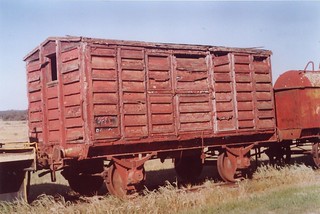
The axleboxes are different for a start. The handbrake is also on a different side to that suggested in the kit instructions. The more obvious difference though is that there are 3 windows. One at each end and one on the handbrake side. The photos on Norm's site were a big help, along with some from my own collection that were taken years ago on a 'may be needed one day' basis. Having built a couple of the newer SEM 4-wheel open wagons I had a supply of spare round axlebox lids so it was simply a case of filing the old ones down and sticking the round ones on. The V hanger for the handbrake lever was also modified so it was shortened and placed on the appropriate side for this wagon. The final modification was the fun part, adding the windows. As it is a louvre van it did help with the location of where to cut the holes. And here is that photo again of the model prior to painting that shows the windows and the styrene strip used to form the window frames:

Some websites and other sources that may help you when you contemplate that next rollingstock project:

-Mark Bau's Victorian Railways site: http://www.victorianrailways.net

-Peter Vincent's website: http://www.pjv101.net/index.htm

-Rob O' Regan's website: http://www.robx1.net/

-Norm Bray's Flickr site: https://www.flickr.com/photos/60901191@N08/

-Brief History Books: http://www.bhbooksvic.com/

-Your local library.

-Local model railway club.

-ARHS Victorian Division (extensive archive of photos and drawings).

And others I may have neglected to mention.


Sandman

Department stock on railways always throws up some interesting wagons that are modified for a specific duty. This particular wagon is a HD loco sand wagon based on the Tommy Bent I wagon. These particular I wagons were converted from Tommys to IC Tippler wagons by removing the side doors and welding a sheet of steel in place. They were converted to sand wagons by adding a hopper and discharge pipes.

The wagon has been made up using a Steam Era Models Tommy Bent I wagon and a VR Casts conversion kit which includes new sides and the hopper. Probably one of the easiest kit bashes to do with the extra bits:


While it does come with decals to suit the HD sand wagon, I decided to substitute the 'Dried Locomotive Sand Only' signage with some BGB ones from my decal box. It is likely my wagon will cover more mileage than the prototype which didn't travel often.

Not another open wagon!

Yep seems that way. I don't think you can ever have enough of these. This is a Steam Era Models welded RY wagon with the early type lever handbrake I finished recently:


I'd like to do more of these with the later type handbrake in the future.

Friday 29 August 2014

Trim and Terrific

Having aquired a Black Diamond Models Flat-Top T-class last year, I set about giving the model a spruce-up recently. The paint was looking a little worn and as I wanted it to be a near-enough representation of T345 as it ran at Maldon in the 1990s it need yellow handrails.

Before:
And after:
The loco is now back on the operational roster and is quite often paired up with my Bendigo Rail Models T333.

No lines...No problem

This is one of those things that takes less time to fix than it does to complaint about. The Auscision Models N cars are very nice but for those who have the sets which feature the silver stripes there was one issue that caught the attention of many; the lack of stripes over the window 'plugs' in the BRN Snack Bar car. When the prototype cars were built the shells were pretty much all the same in regards to the windows. So when they fitted the Snack Bar in the BRN they simply fitted 'plugs' into the window spaces behind the serving area. In the Teacup and early V/line era these cars had silver stripes which passed through the window area and on the BRN they were panted through the 'plugs'. On the model this detail was unfortunately missed:

As you can see the fix to the problem is easy thanks to Bills Billboards who make a decal set to cover up the mistake. The decals are best applied in sections (in other words, cut the decal into 4 stripes and apply individually). The results speak for themselves:
Another small job I did some time ago was to paint the wheels on all the cars and the D van. You can't see it very well in the picture and in some way that is part of the point. Even when new the prototype didn't have chrome wheels. Again it is easier to fix with paint rather than complain about it.


A BCE, but no D

I have been waiting on a BCE carriage for some time, plenty of kits or RTR models have been sold on ebay over the years but have always been outside my price range. Thus when an opportunity came up to get one in return for building some SEM sheep wagons I jumped at it:
The model itself is a Northern Models kit which for it's time was quite good. However I want this model to be a close representation of 2BCE as it appeared in the VGR in the late 1980s. That meant the paint had to be stripped so a new coat of Crimson Lake paint could be applied:

As you can see, the paint was removed using Methylated Spirits and an old toothbrush. The underframe will simply receive a new coat of black after the under-gear is added.

The next update on this project should see the model painted and finished.

Saturday 19 July 2014

Another J-class? You are Joking right?

Seems not. I'm taking a break from building my oil-burning J-class so I can tackle some other projects. I did decide that if I could get a coal burning version I would get one. About a month ago an opportunity came up to purchase one at a good price. Money was saved and a couple of days ago I picked it up:

The model itself is quite well built and runs nicely. There are a couple of things that will change in time. Things like repainting the engine to represent J515 as it was running on the VGR up until recently (so the red flutes on the rods will remain and new numbers sourced). The cab interior will be picked out in the appropriate colours and a crew installed. A working coupler will be fitted to the front so it can be used with other locos and for shunting. It will fit in with my aim of having rollingstock that runs on the VGR while also filling a gap in my normal roster. Once the changes are made I can hopefully resume work on the oil version.

Looking a bit sheepish Part 2

After working on these wagons for a month, they have finally been completed:


They are now ready for delivery to the client. And the workshop is ready to tackle another project.

Saturday 21 June 2014

Looking a bit sheepish Part 1

I seldom build things for other people, most things I build are for me and replaced if I do a better job the second time round. However the opportunity to obtain a missing item of rollingstock in the collection in return for building some wagons is too good to pass up.

The wagons I'm building for the 'client' is some Steam Era Models L type sheep wagons. Released by SEM just over a decade ago, this kit is a challenge and is sure to put the builder in the nuthouse if they intend on building more than 5 of them. As I need to build 3 of them it was obvious the best way to tackle them is a staged production line. Each wagon is built to a certain stage and then the next one to the same stage and so on. Common sense to many I'm sure.

Here is a couple of progress photos to date. It has taken about a week to get to this stage as other life commitments take precedence:


As you can see 3 underframes have been built and 2 bodies built awaiting installation of the upper floor. Work will begin on the 3rd body and then all 3 can have the upper floors installed.

Tuesday 15 April 2014

The Overdue, a tale of a long-winded project

Modellers in Australia have got used to RTR items taking a long time from inception to delivery. Some recent examples include the Eureka R-class and TrainOrama GM-class locomotives which took the best part of 8 years to be delivered. Things are somewhat different when you have more control over when a model is completed.

That has been the case with the latest model I have completed. The model was originally a prize at a social night swindle for the local model railway club Easter exhibition back in 2006. It was in black black plastic as it was obviously a sample for the importer who later went on to sell the same carriages in silver and only requiring decals. I decided plain black was not how it was going to stay and after comparing various other cars I decided to turn it into a Overland sleeper car. The paint went on pretty quick and at least one side received its decals and then the project stopped. Why? Well I put it down to a few things; in the time between when I last worked on it to now I have moved house twice and other projects took my interest so I was more into building items.

Last week I decided that it was time to get this car finished. The decals for the other side were fitted and finally sealed in with dullcote, and here is the result:

The model is a Frateschi sleeping car, painted and decaled with BGB Overland decals to make a near-enough sleeping car as they operated from the 1950s till 2000 when the livery changed to plain stainless steel. It now joins the carriage fleet as a fully finished item of rollingstock.

Friday 4 April 2014

You rang for a U van? The sequel

With Easter coming up in a few weeks and the need to have some projects finished in time to run at the local model railway exhibition I have been pushing some easy jobs through. Painting the U van was one of these and it has now been completed:

As you can see the use of the Humbrol #100 red/brown is pretty close to VR wagon red. Funnily enough I got the tip from the SEM instructions for the FQX container flats, although at the time those instructions were printed it was actually Humbrol #110. It lends itself better to brush painting than other paints so it will probably be my paint of choice from now on now I have a colour that represents VR wagon red nicely. Focus will now turn to finishing the FQX containers flats and maybe a surprise carriage project.


Saturday 22 March 2014

You rang for a U van?

The Steam Era Models U van kit has been around for 30 odd years, having been originally released under the Broad Gauge Models brand in the 1980s. The model was starting to become a little dated so it has been recently upgraded to meet today's standards. Separate etched handrails and other details such as the handbrake are now included in a brass fret in the kit (previously one had to buy a handbrake etch as an optional part separately). The biggest change is the roof, which has been changed to a corrugated iron version rather than the plain roof. The model looks very smart and is comparable to the RTR offers of Auscision if built well:

This model is now in the process of being painted. I'm trying a new paint on this model, Humbrol #100 red brown which is a fairly close match to VR wagon red in my eyes. I shall see how it turns out.

Tuesday 18 March 2014

Container Traffic

Been a few months since I put up a picture of the first container wagon I built. Since then it has been painted, along with two more:


Each wagon is loaded with two 20ft containers. The containers are a Walthers product and come supplied already painted and lettered. The real fun I had with building the wagons was not so much the construction side but more applying the decals. Each side has 11 decals (10 if you opt not to apply the VR logos) and it can be hard reading the fine white print on the blue decal backing paper. Thankfully Steam Era supply an excellent diagram in the instructions that have the harder to read ones blown up. With these 3 done work has just been completed on building number 4 and is now ready for paint. My aim is to have a train of about 10 wagons depending on how many I can fit into one of Auscision's gold storage boxes. When finished I will have a train suitable for haulage by some of my more modern locomotives such as a A-class, C-class and hopefully a future Austrains G-class.

Saturday 22 February 2014

Project Vulcan Part 4

Some more work has been done on the engine unit chassis. The brake beams, brake blocks, wheel weights, injector drain pipes, pony truck, connecting rods, motor/gearbox and pickups have been fitted.  I decided it was a good time to test the chassis before moving on to fitting the cylinders and motion gear. After wiring up the motor to the pickups and bending the pickups to touch the back of the coupled wheels I put the chassis on the test track. That was when the fun started, the chassis shorted out badly. The first thing I checked was the brake blocks in case they were touching the wheels (most common cause of short circuits on brass steam loco chassis) but they seemed to have clearance. Next thing I checked was if the pickups were touching the brake beams behind the wheels, but that wasn't it either. After 2 hours trying to figure out the problem I decided to sleep on it. Next morning I decided to check one thing I had taken for granted, the tags that locate the pickups on the solder pads on the underside of the PCB keeper plate. The first method to test if this was the cause was to put a layer of clear tape over the holes on top of the plate, but the tags poked through them. So I decided the only way to fix the problem properly was to remove all the pickups, trim the tags and refit them. Time to put everything back together and test again. Sucess...sort of. The wheels were now turning but not smoothly. I decided to turn the motor around in the gearbox and try again, improved but still not nearly perfect. I'll have a short break from the chassis for a while while I get other projects finished then come back to getting it tuned to run sweetly.

So while a photo doesn't show a whole lot, in other ways it shows a great deal of progress in details that have been added since the last update:

Attention will now turn to getting the 3 FQX container flats painted and decalled.

Friday 14 February 2014

Looking sheepish

This is what happens when you visit your local model railway supply shop intending to purchase one thing and instead walk out with a new product that has just arrived in the store:


The Ozrail Model Trains Victorian Railways L sheep wagon has been out for some time, but has only just been stocked at the local model railway shop PCB/JayCar in Bendigo. While I like to build as much rollingstock as possible, I decided to purchase two of these wagons with the round roof, as to modify a SEM one takes a little work. The models have a nice amount of weight and the detail is pretty good. I do have a couple of issues; the couplings are plastic (but have a metal Kadee spring) but I will most likely replace them with Kadee #158s, the wheels are quite shiny but again can be fixed with paint, the final one is the W irons which look a little shallow. The wheels are very fine when compared to those made by SEM, so they are designed for finescale trackwork. In addition to changing couplers and painting wheels, these two wagons will be renumbered to represent the two operational L wagons at the VGR: L1379 and L1400.

And while I was in the buying mood for some RTR stock, I decided to get this:

The Auscision Models U vans have been available for a couple of years. I already have one of these vans with advertising but I needed another to represent U931, again a preserved example at the VGR. Thus this model will be re-numbered in due course.


A touch of class....First Class Part 2.

Some projects seem to take ages to finish. Either weather prohibits painting or something else sparks my interest. This is true of the AW I have has in progress for nearly 6 months. With the need to clear my backlog of projects I decided to get the lettering on and dullcote the car. Then came the fun part: installing the handrails which are now an etch supplied by SEM. After pre-painting them as per instructions I then went to install them. Problem is I didn't clear the holes of paint first, which resulted in one side set of handrails ruined. So one side will wait until after the Sandown exhibition in March where I will hopefully be able to buy some replacements from SEM.

Here is how the car looks, with the interior yet to be installed:


Now I can get back to finishing some container wagons and the J-class.

Tuesday 11 February 2014

Project Vulcan Part 3

After some time away from this project, a start has been made on the engine unit chassis. The quality of etchings in this kit really come to the fore here as the parts require virtually no filing to fit in the holes. The only adjustments have been the axle openings so that the horn blocks fit snugly. The drawbar for the tender has been fitted so the photos show them paired together. For those wondering what the wire between the wheels is, this is what the brake beams and brake blocks will be attached to and will be trimmed once they are fitted. Still to be fitted are the cylinders, pony truck and various other details then I can work on installing the motor: